

Facebook Integration using Reactive Native IOS APP !
This article we will show you how to create Facebook Login using React-Native that will work for both iOS and Android Platform.
Creating new React Native project
To create a new React Native project, just open your Terminal/iTerm app and run the following command.
$ ~ mkdir ReactNativeApp$ ~ cd ReactNativeApp$ ReactNativeApp react-native init DemoFBLoginBefore integrating with Facebook to React app, we have to first create a Facebook app on Facebook developer console.
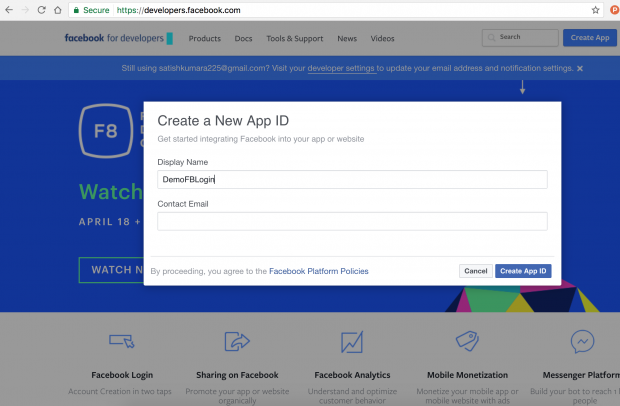
Clic on Create App and enter the display name which will be displayed publicly to user. It is recommended to provide the contact email. While authenticating, if users has any questions they may contact you on this email.
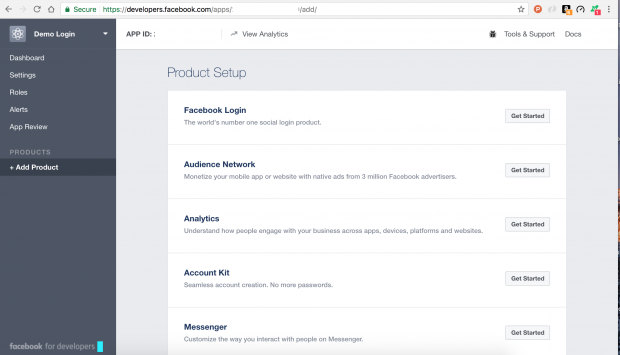
Once the App is created it will display the Product Setup page.
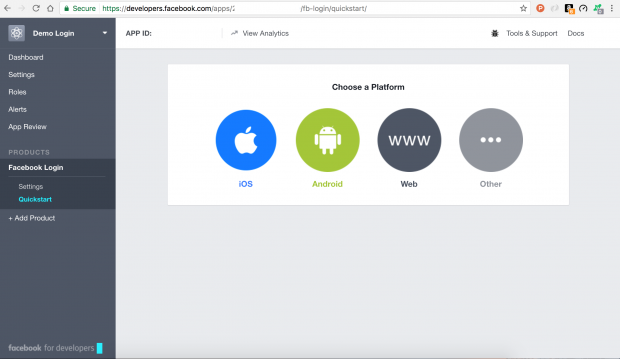
Let’s click on Get Started with Facebook Login. First let’s start with iOS platform, so select iOS and download the SDK and unzip the archive to ~/Documents/FacebookSDK. .
Now,Install and link the Facebook SDK for React Native packages and dependencies in terminal and start npm server.
$ cd DemoFBLogin$ DemoFBLogin react-native install react-native-fbsdk$ DemoFBLogin react-native link react-native-fbsdk$ DemoFBLogin npm start
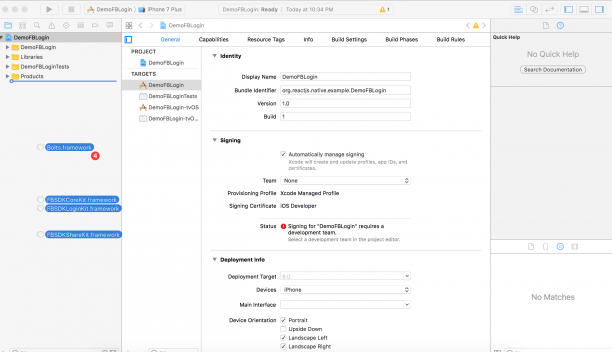
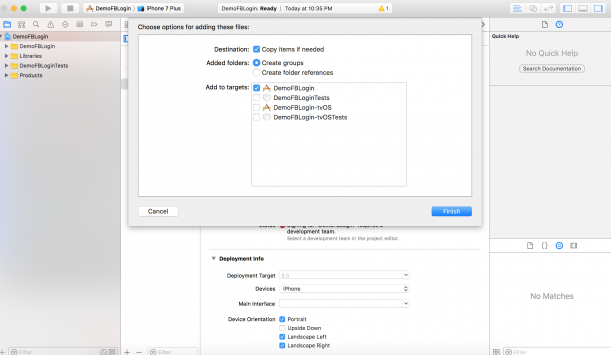
Open the ios project form the DemoFBLogin/ios folder and drag and drop the FBSDKLoginKit.framework, FBSDKShareKit.framework, Bots.framework, FBSDKCoreKit.framework inside your project.
And make sure you have checked copy items if needed and click on Finish
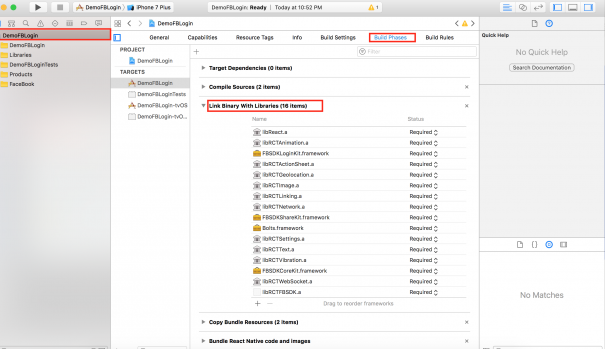
Now go to Link Binary With Libraries and check all this FBSDKs are linked properly.
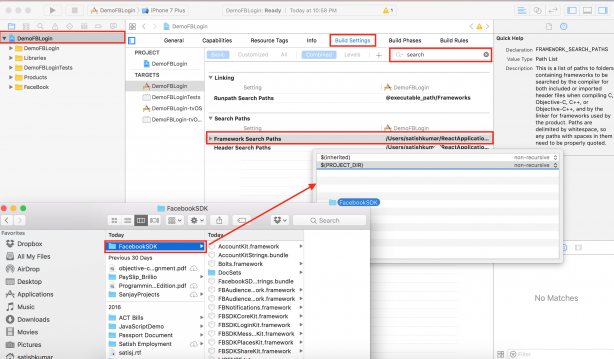
Let’s also set the Framework Search Path of the FBSDK which we downloaded and unzip the archive to ~/Documents/FacebookSDK
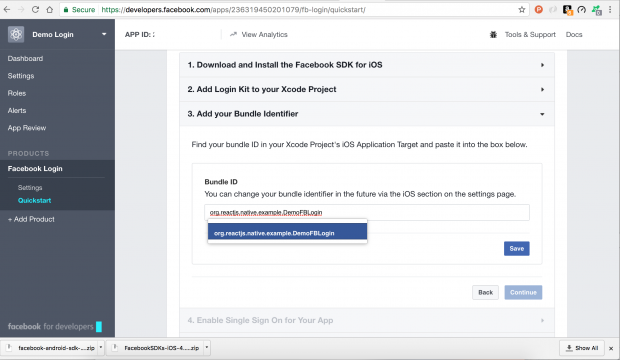
Go back to the developer.facebook.com where we created App prior and Add your Bundle Identifier
Enable single sign on, and Configure your info.plist follow the step by step instruction provide in developer.facebook.com.

Connect App Delegate , Open your Xcode project go to AppDelegate.m and import and paste the following code inside didFinishLaunchingWithOptions
[[FBSDKApplicationDelegate sharedInstance] application:application
didFinishLaunchingWithOptions:launchOptions];
Declare OpenUrl:sourceApplicaiton:annotation method below didFinishLaunchingWithOptions
- (BOOL)application:(UIApplication *)application openURL:(NSURL *)url
sourceApplication:(NSString *)sourceApplication annotation:(id)annotation {
BOOL handled = [[FBSDKApplicationDelegate sharedInstance] application:application
openURL:url
sourceApplication:sourceApplication
annotation:annotation
];
// Add any custom logic here.
return handled;
}
In case if you find any error as show below
That is because we need to do npm install in our react-native project folder, open your terminal and navigate to your project folder and type npm install or npm i after installation clean (⇧⌘K) and build (⌘B) that error will go.
Now open the react-native project with VS Code IDE, directly by opening folder via VC Code or open your terminal and navigate to your project folder and code. Go to Debug editor(⇧⌘D) and Add Configuration by adding iOS platform.
Open index.ios.js import FBSDK, { LoginManager } from ‘react-native-fbsdk’ and create a function called _fbAuth i start with _ to signify that it’s a private method inside this function call logInWithReadPermissions form FB loginManage and handled the success and cancel state snippet looks something like
_fbAuth() {
LoginManager.logInWithReadPermissions(['public_profile']).then(
function(result) {
if (result.isCancelled) {
alert('Login cancelled');
} else {
alert('Login success with permissions: ' +
result.grantedPermissions.toString());
}
},
function(error) {
alert('Login fail with error: ' + error);
}
);

}
Remove all the code inside render() function except container view and create button by with saying Login Via Facebook, Later let’s assign the _fbAuth function for button. we do this by onPress in your opening tag of and supplying the function {this._fbAuth}. Over all code will look something like this:
import React, {
Component
} from 'react';
import {
AppRegistry,
StyleSheet,
Text,
View,
TouchableOpacity
} from 'react-native';
import FBSDK, {
LoginManager
} from 'react-native-fbsdk'

export default class DemoFBLogin extends Component {

_fbAuth() {
LoginManager.logInWithReadPermissions(['public_profile']).then(
function(result) {
if (result.isCancelled) {
alert('Login cancelled');
} else {
alert('Login success with permissions: ' +
result.grantedPermissions.toString());
}
},
function(error) {
alert('Login fail with error: ' + error);
}
);

}
render() {
return (


Login Via FaceBook


);
}
}

