WINDOWS
Download and install
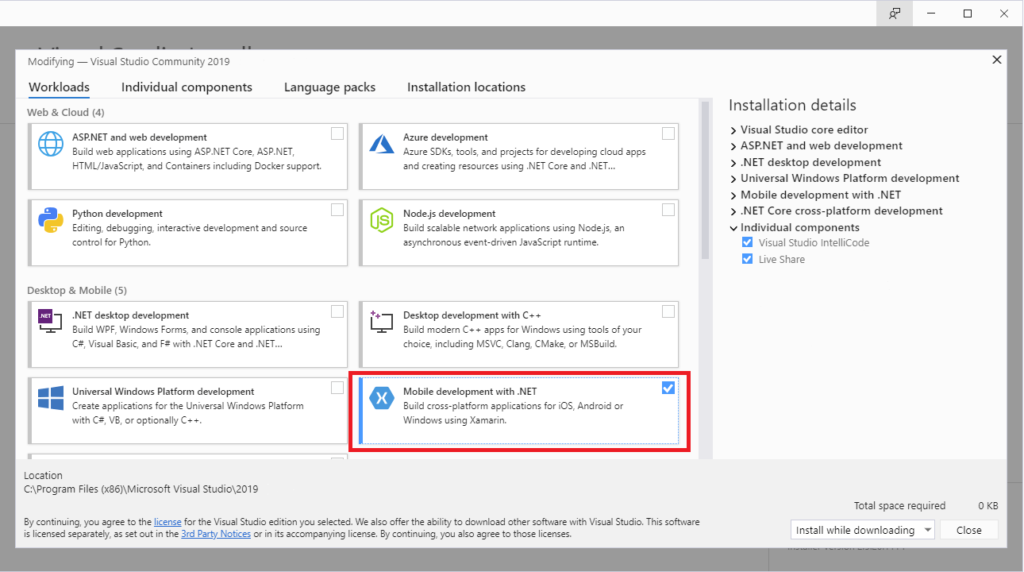
First APP : During installation, select the Mobile development with .NET workload.
Already have Visual Studio?
- Select the Windows key, type Visual Studio Installer, and press Enter
- If prompted, allow the installer to update itself
- If an update for Visual Studio 2019 is available, an Update button will be shown. Select it to update before modifying the installation.
- Find your Visual Studio 2019 installation and select Modify
- Select Mobile development with .NET and click Modify
Check for Visual Studio updates
- Select the Windows key, type Visual Studio Installer, and press Enter.
- If prompted, allow the installer to update itself.
- If an update is available, your Visual Studio 2019 installation will have an Update button. Select it to update.
Create your app
- Open Visual Studio 2019.
- Select Create a new project.
- Select Mobile from the Project type drop-down.
- Select the Mobile App (Xamarin.Forms) template and click Next.
- Enter AwesomeApp as the project name and click Create.
- Select the Blank template. Ensure Android and iOS are both selected, and click OK.
- Android SDK Install
- Specific versions of the Android SDK are required to build projects. If your machine is missing the required SDK, you’ll see the following prompt while the new project is loading. Click Accept to have the automatic installation begin.
Android SDK Prompt asking the user to install a specific Android SDK version to build a project.
Restore NuGet packages
The package restore process will start automatically. Wait until the Restored or Ready message appears in the status bar at the bottom left of the screen.
Configure device
To develop with your Android device, USB debugging needs to be enabled.
Enable developer mode
- Go to the Settings screen.
- Find Build number by using the search at the top of the settings screen, or locate it in About phone.
- Tap Build number 7-10 times until “You are now a developer!” pops up.
- Click Create.
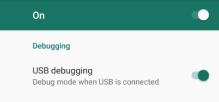
Check USB debugging status
- Go to the Settings screen.
- Find USB debugging by using the search at the top of the settings screen, or locate it in Developer options.
- Enable USB debugging if it isn’t enabled already.
Trust device
- Plug your device into your computer.
- You will be prompted to Allow USB debugging.
- Check Always allow from this computer.
- Click Allow.
Set up Android emulator
If you don’t have a device to deploy to, you’ll need to set up an Android emulator or use a device. If you’ve already done this, you can skip this step.
If this if your first time building a Xamarin application, you’ll need to create a new Android Emulator. You’ll see “Android Emulator” in the debug menu. Click it to start the creation process.

This brings up a UAC prompt to be accepted and then the emulator creation process. The options are automatically populated for a base emulator. If required, change any options and then select Create.
At this point, you may be prompted to agree to the license agreement for the Android emulator. Read through and select Accept to continue the process. This will download the emulator images and finalize the creation of the emulator for use in Visual Studio.
Once the emulator has been created, you’ll see a button that says Start. Click it.
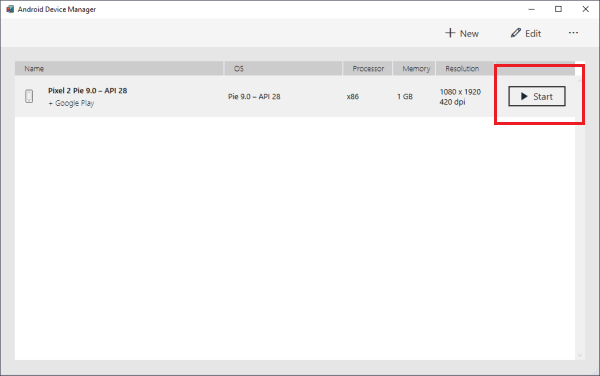
The Android emulator will launch. Wait for it to fully finish starting and you’ll see it displayed in the Visual Studio debug menu. This may take some time if you aren’t using hardware acceleration.
Your Android emulator has now been created and is ready to use. Next time you run Visual Studio, the emulator will appear directly in the debug target window and will start when you select it. If you ran into any issues or have performance issues with the emulator, read through the full setup documentation.
CODE
MainPage.xaml
<Frame BackgroundColor="#2196F3" Padding="24" CornerRadius="0" >
<Frame BackgroundColor="DeepPink" Padding="24" CornerRadius="0" >
<Frame BackgroundColor="DeepPink" Padding="24" CornerRadius="0">
    <Label Text="Welcome to Xamarin.Forms!" HorizontalTextAlignment="Center" TextColor="White" FontSize="36"/>
  </Frame>
  <Button Text="Click Me" />
<StackLayout>
  <Frame BackgroundColor="DeepPink" Padding="24" CornerRadius="0">
    <Label Text="Welcome to Xamarin.Forms!" HorizontalTextAlignment="Center" TextColor="White" FontSize="36"/>
  </Frame>
  <!--Add Button Here -->
  <Button Text="Click Me" />
  <Label Text="Start developing now" FontSize="Large" Padding="30,10,30,10" />
  <!--More Labels here -->
</StackLayout>
<Button Text="Click Me" Clicked="Handle_Clicked" />
MainPage.xaml.cs
int count = 0;
void Handle_Clicked(object sender, System.EventArgs e)
{
    count++;
    ((Button)sender).Text = $"You clicked {count} times.";
}
public partial class MainPage : ContentPage
{
    public MainPage()
    {
        InitializeComponent();
    }
    int count = 0;
    void Handle_Clicked(object sender, System.EventArgs e)
    {
        count++;
        ((Button)sender).Text = $"You clicked {count} times.";
    }
}
Run your app
From the menu, select Debug > Start Debugging. If this option is disabled, ensure an emulator is selected.
Your application will build then deploy to the Android device/emulator and run.
Android emulator running the Xamarin app. A ‘Welcome to Xamarin.Forms!` message is displayed.
MAC-OS
Download and install
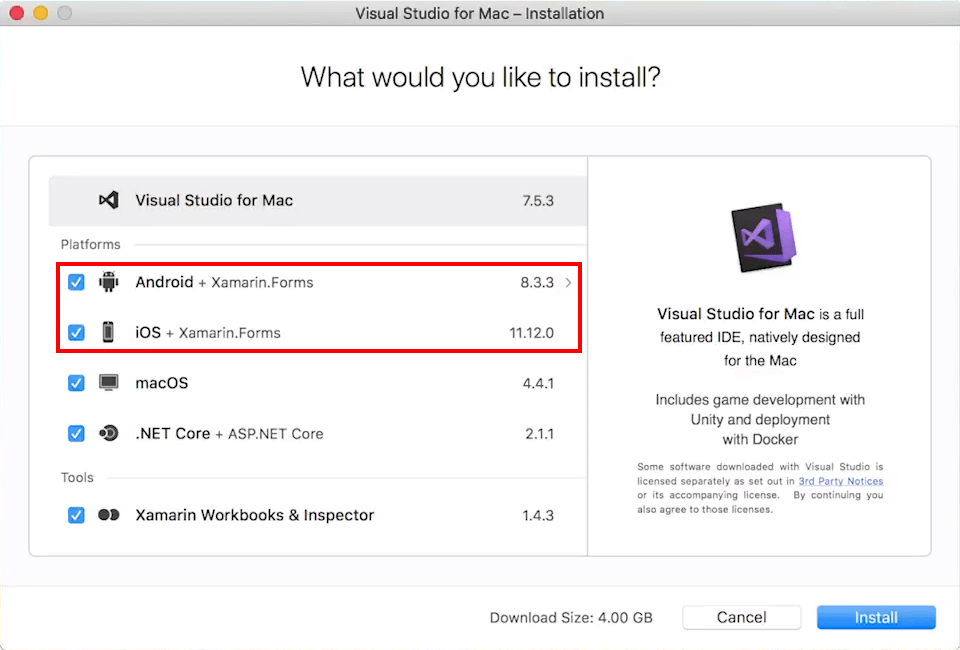
During installation, ensure the Android + Xamarin.Forms and iOS + Xamarin.Forms platforms are selected.
Check for Visual Studio updates
- Open Visual Studio for Mac.
- In the menu bar, select Visual Studio > Check for Updates.
- Available updates will be displayed and select Update.
Optional: Install Xcode
If you want to build Xamarin apps for iOS or macOS, you’ll also need:
Create your app
- Open Visual Studio 2019 for Mac.
- Select New Project.
- Select Multiplatform > App > Blank Forms App and click Next.
- Enter AwesomeApp as the app name, and click Next.
- Click Create.
Restore NuGet packages
- NuGet is a package manager that will bring in the dependencies of your new app.
- After your application loads, right click on the AwesomeApp solution and select Restore NuGet Packages.
Configure device
To develop with your Android device, USB debugging needs to be enabled. Follow these steps on the device to connect it to Visual Studio. If you do not have an Android device, skip below to emulator setup instructions.
Enable developer mode
- Go to the Settings screen.
- Find Build number by using the search at the top of the settings screen, or locate it in About phone.
- Tap Build number 7-10 times until “You are now a developer!” pops up.
- Click Create.
Check USB debugging status
- Go to the Settings screen.
- Find USB debugging by using search at the top of the settings screen, or locate it in Developer options.
- Enable USB debugging if it isn’t enabled already.

Trust device
- Plug your device into your computer.
- You will be prompted to Allow USB debugging.
- Check Always allow from this computer.
- Click Allow.
Set up Android emulator
- If you don’t have a device to deploy to, you’ll need to set up an Android emulator or device. If you’ve already done this or only wish to deploy to iOS, you can skip this step.
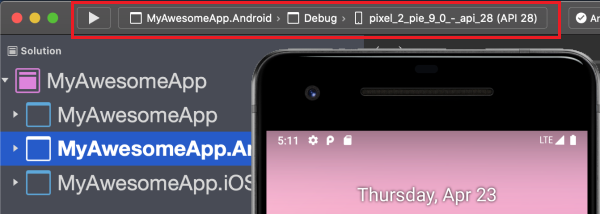
- If this if your first time building a Xamarin application, you’ll need to create a new Android Emulator. You’ll see “Select Device” in the debug menu. Click the run button to start the creation process.

- You are now prompted to verify you’d like to create an emulator. Click Add a Virtual Device:
- This opens the Android Device Manager. Click + New Device to start the creation process.
- The options are automatically populated for a base emulator. If required, change any options and then select Create.
- At this point, you may be prompted to agree to the license agreement for the Android emulator. Read through and select Accept to continue the process. This will download the emulator images and finalize the creation of the emulator for use in Visual Studio.
- Once the emulator has been created, you’ll see a button that says Play. Click it and the Android emulator will launch. Wait for it to fully finish starting and you’ll see it displayed in the Visual Studio debug menu. This may take some time if you aren’t using hardware acceleration.
CODE
When developing applications with Xamarin.Forms, XAML Hot Reload is available when you’re debugging your application. This means that you can change the XAML user interface (UI) while the application is running and the UI will update automatically.
In the Solution Explorer, double-click the MainPage.xaml file under the AwesomeApp project.
Currently, the BackgroundColor of the Frame is set to Xamarin blue as shown in the following code:
MainPage.xaml
<Frame BackgroundColor="#2196F3" Padding="24" CornerRadius="0" >
<Frame BackgroundColor="DeepPink" Padding="24" CornerRadius="0" >
  <Frame BackgroundColor="DeepPink" Padding="24" CornerRadius="0">
    <Label Text="Welcome to Xamarin.Forms!" HorizontalTextAlignment="Center" TextColor="White" FontSize="36"/>
  </Frame>
<Button Text="Click Me" />
<StackLayout>
  <Frame BackgroundColor="DeepPink" Padding="24" CornerRadius="0">
    <Label Text="Welcome to Xamarin.Forms!" HorizontalTextAlignment="Center" TextColor="White" FontSize="36"/>
  </Frame>
  <!--Add Button Here -->
  <Button Text="Click Me" />
  <Label Text="Start developing now" FontSize="Large" Padding="30,10,30,10" />
  <!--More Labels here -->
</StackLayout>
<Button Text="Click Me" Clicked="Handle_Clicked" />
MainPage.xaml.cs
int count = 0;
void Handle_Clicked(object sender, System.EventArgs e)
{
    count++;
    ((Button)sender).Text = $"You clicked {count} times.";
}
public partial class MainPage : ContentPage
{
    public MainPage()
    {
        InitializeComponent();
    }
    int count = 0;
    void Handle_Clicked(object sender, System.EventArgs e)
    {
        count++;
        ((Button)sender).Text = $"You clicked {count} times.";
    }
}
Run your app
- From the menu, select Run > Start Debugging. If this option is disabled, ensure an emulator is selected.
- Your application will build then deploy to the Android device/emulator and run.
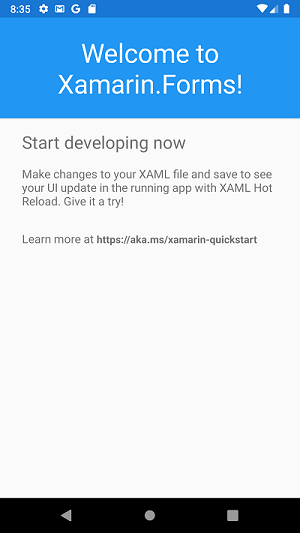
- Android emulator running the Xamarin app. A ‘Welcome to Xamarin.Forms!` message is displayed.
Optional: Run on iOS
- Right-click on the AwesomeApp.iOS project and select Set As Startup Project.
- Set the iOS project as the startup project.
- Start your app
From the menu, select Run > Start Debugging. If this option is disabled, ensure a simulator is selected. - Your application will build then deploy to the iOS simulator and run.
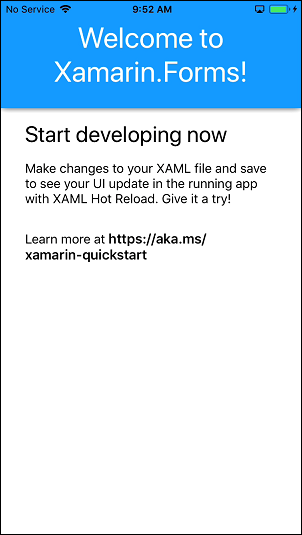
- iOS simulator running the Xamarin app. A ‘Welcome to Xamarin.Forms!` message is displayed.
Congratulations, you’ve built and run your first .NET mobile app!